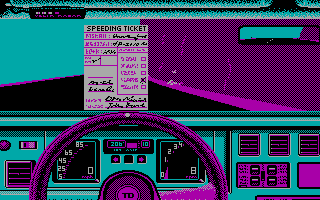
The original 1987 "Test Drive", CGA version. There was only one repeating scenario in the original - driving along cliffs.
I've been lecturing computer graphics this semester. The students have to do a large assignment where they make a game in OpenGL. I thought I'd make one too as a kind of demonstration of how to use various techniques in OpenGL, and the process I would use to make a larger programme fit together in steps. Also because it was fun.
The original 1987 "Test Drive", CGA version. There was only one repeating scenario in the original - driving along cliffs.
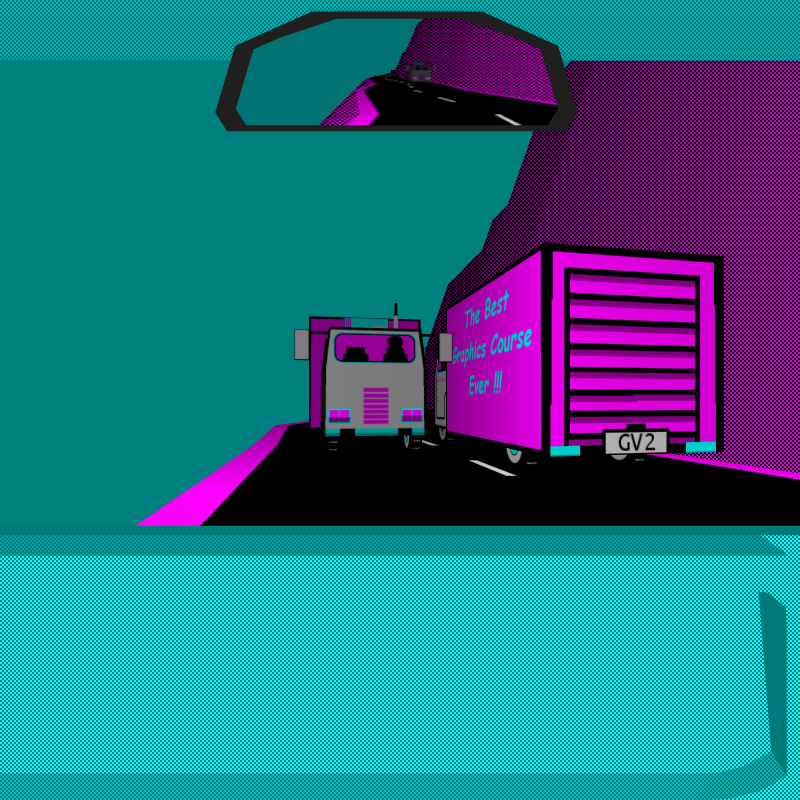
In the late 1980s my cousin had a computer with games. My brother and I thought that this was amazing. He had a very primitive car game called "Test Drive", which had CGA graphics featuring magenta cliffs and cyan sky. It was like driving through a surreal nightmare world. I decided to remake this game in OpenGL, with CGA-styled graphics.
| Windows binary | opengl_test_drive_clone_win32.zip (2 MB) |
| source code repository | https://github.com/capnramses/opengl_test_drive_clone |
Requires OpenGL 4.2 capable drivers and hardware. I deliberately used modern interface features to demonstrate. Unfortunately OpenGL has no mechanism to update the library interface for older hardware.
I believe that this is my third completed game, after WebGL games Dolphin Rescue, and Mountain King.
To play the original game you had to first get into gear from neutral, then accelerate. The same applies here. If you over-rev the engine the car explodes. In the original the windscreen would inexplicably shatter. I have preserved this feature.
| Q,A | change gears |
| cursor arrows | accelerator, brake, and steering |
| shoulder buttons | change gears |
| right trigger | accelerator |
| left trigger | brake |
| right thumbstick | steering wheel |
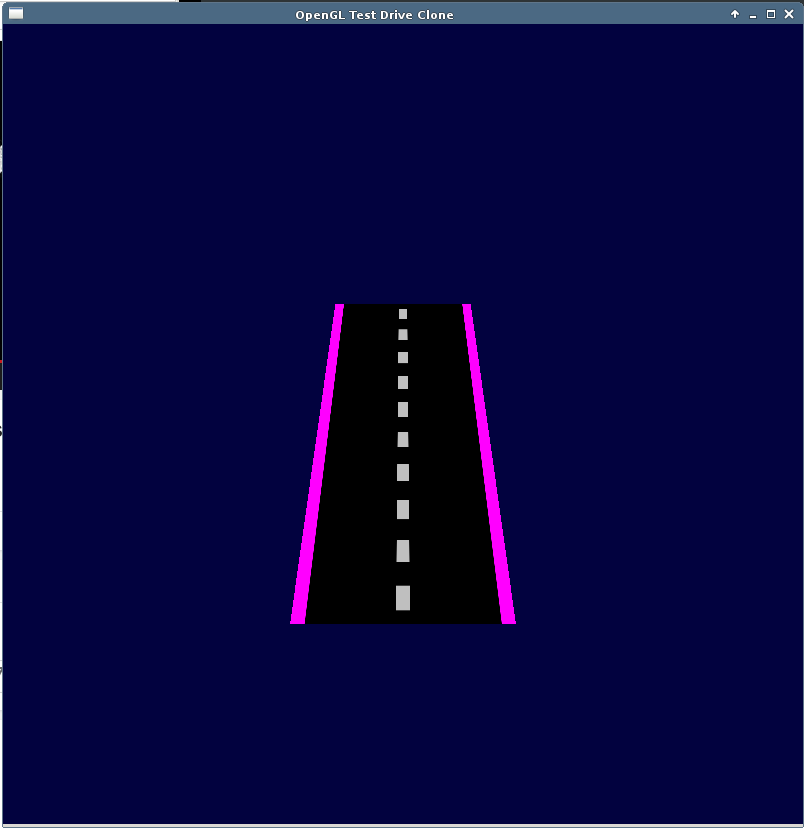
I started with a basic 3d mesh viewer and put 2 triangles and a texture to make a road segment.
I started by creating a road segment with a very basic texture. I hard-coded the creation of the triangles for the road. I then put this in a loop to extend the road to many segments. I have a single, simple shader for the road.
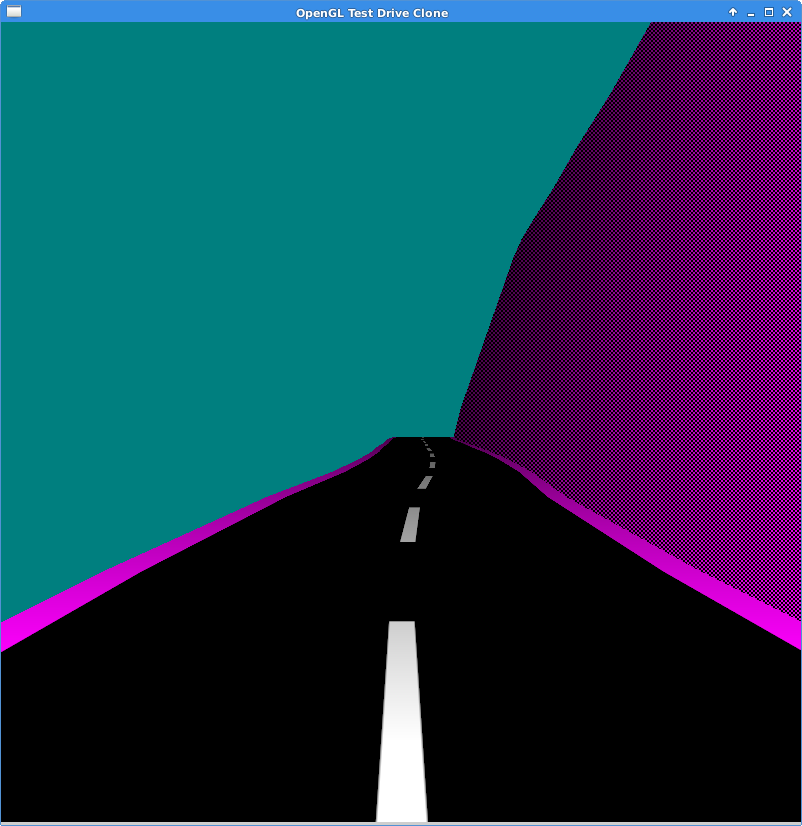
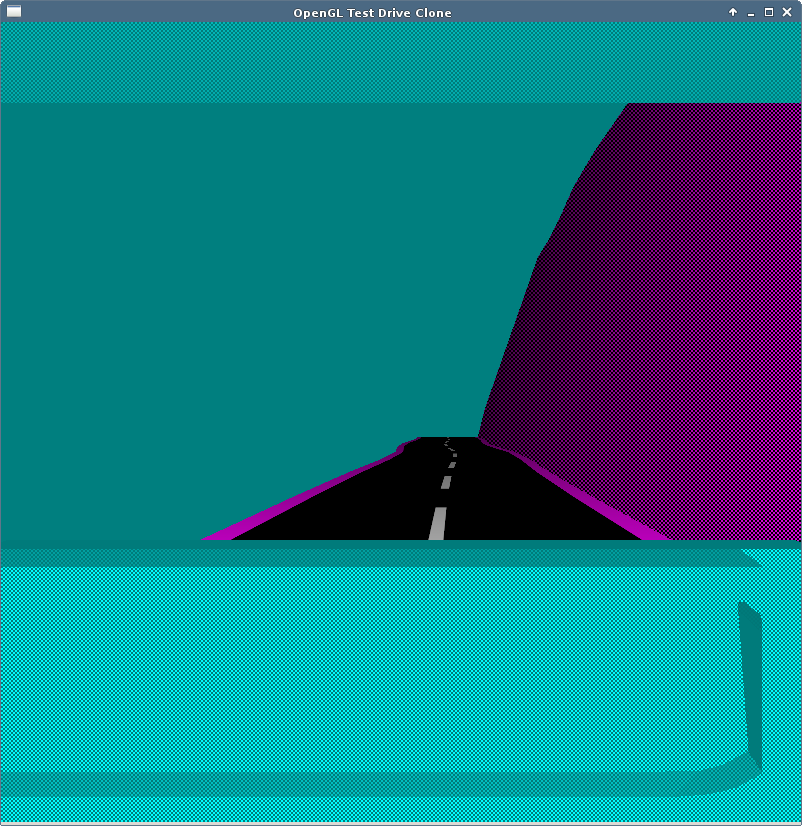
Several road segments, with random X offsets at segment ends. A cliff is added to the side of each segment. It has a special shader to do the hatching effect in screen-space.
I extended my road's length in a loop, and added some random variation to the X position at the end/start of each segment, using the rand() function. I wanted to add a few natural kinks to the segments. I also started to add the cliff wall using the same loop and X positions as the right side of the road. I added an additional segment to the top of the cliff, and leaned to further back along the X axis, so that the cliff looked a bit less sheer. If you look at the original CGA graphics, they had a really horrible cross-hatching effect to make some parts look like they were a different shade of magenta. I didn't want to just use a texture, because that might actually start to look good - I wanted the cross-hatching to be in screen space, like the original. In a new fragment shader, I used the built-in gl_FragCoord variable to determine the on-screen pixel coordinates of each fragment of cliff-face. If it was on an odd-numbered horizontal fragment, and an even-numbered vertical fragment, or vice versa, I made it black. It was pretty easy to add the left-hand side cliff face using the same method. I also created an array of these road lengths (of about 16 straight segments each) - enough for a whole level.
To add some interesting variations to my course, I randomly decided if each set of every 4 road lengths was going to be a "straight", a "left turn", or a "right turn". For the turns I added the first part of a sine-wave to my X offsets to give a gradual turn. This resulted in much more interesting-looking terrain, and also ensured some long, straight bits that would allow the player to get up to a really high speed.
As I build my road mesh, I record the positions of the start and end of each segment, so that I can later use this for path-finding and collision-detection.

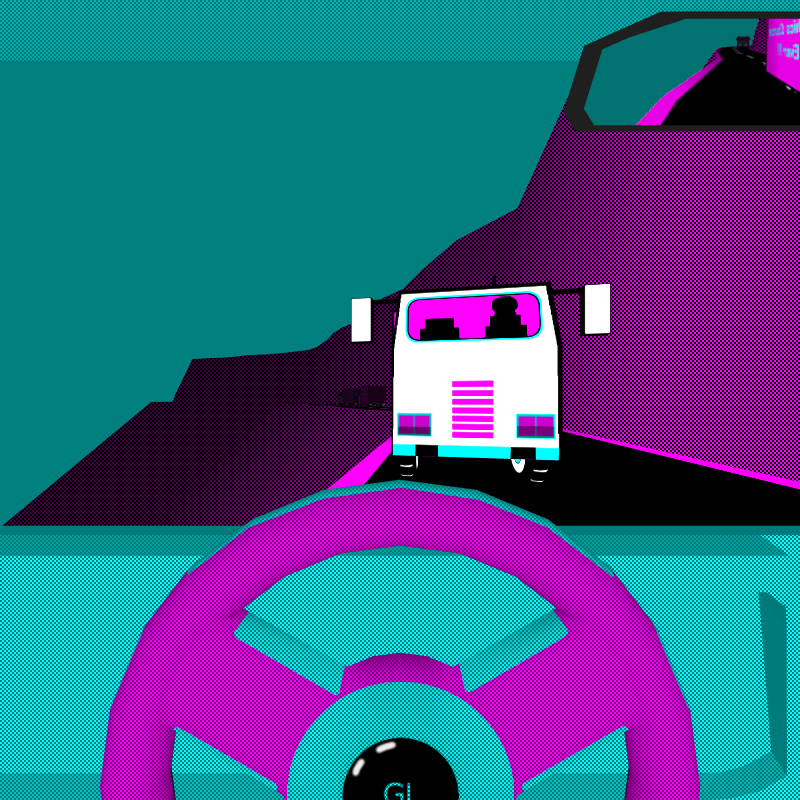
Creating a car interior in Blender.
I decided to push the envelope and do a 3d car interior for the player. I move this along with the camera. If you were to view from outside you would see a disembodied dashboard driving along the road. I wanted to limit myself to just one of the drivable cars from the original, so I tried to copy the style of one of the original's interiors (I'm not sure which car model it is). I just made a really simple mesh in Blender with box-modelling and extrusion.
The in-game view. I used another cross-hatching shader, similar to the cliffs, but with cyan. I darken based on the dot product of the normal with the direction to the camera, so that front-facing surfaces are lighter. I also added a little bit of darken-by-depth to all my fragment shaders, which made the scene "pop" a bit more.
The original had some pretty neat dynamic dashboard elements, so I thought I'd make a few interesting gauges too. The steering wheel in the original sucked - I decided to do a full 3d rotating wheel instead of re-creating the weird moving-dot mechanism that games at that time employed. A really interesting feature of the original was the rear-vision mirror. I thought that would be pretty neat to do in OpenGL.
I wrote a very simple Wavefront .obj loader for loading all the meshes in the game. You can find that in the source-code.
You could do this with another viewport, but I wanted to fit it to an interesting, non-rectangular shaped mirror. I render the scene again, but with the camera facing to the rear. I use a secondary framebuffer to draw this to a texture instead of to the screen. In my normal, forward-facing, rendering, I draw a mesh for the mirror, and sample the texture from the other framebuffer to fit across the mirror.
I drew the scene again with a rear-facing camera, and rendered this to a texture. When drawing the normal scene I sample that texture onto the mirror. I had to flip this horizontally so that it was actually mirrored, and not just what a rear-facing person would see!
The problem with this idea, is that this is not a mirrored projection! So the mirror had the cliffs on the left-hand-side! I just inverted the horizontal texture coordinate to address this.
I rotate my steering wheel with a Z-axis rotation matrix, based on the current steering angle. This is very smooth when using analogue thumb-stick controls.
I created a mesh for the steering wheel, with a similar shader to the dashboard, except also with a simple texture. The wheel is rotated based on the current steering angle.
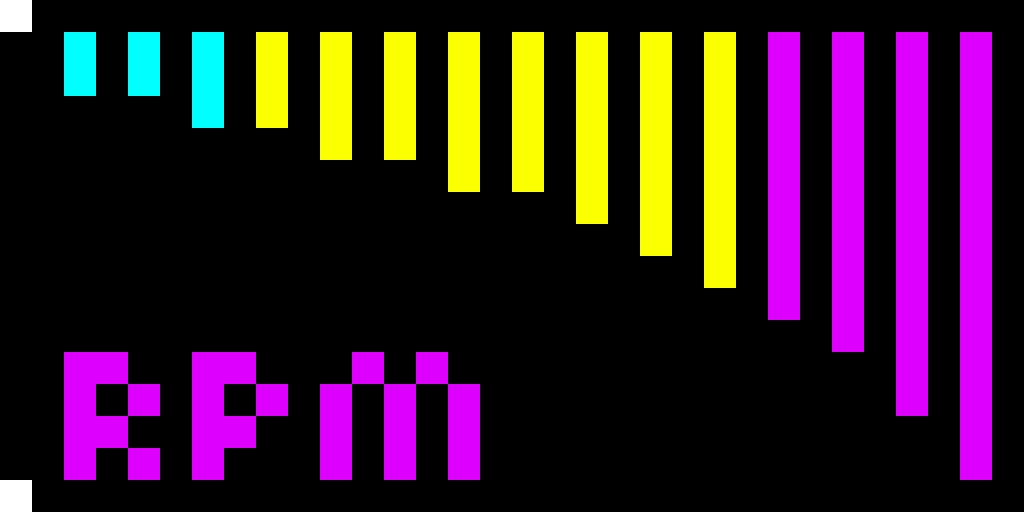
The "emtpy" tachometer image (left), and "full" (right). Depending on my current RPM, I'll decide if a fragment should sample from the empty or full texture.
In the original game, the engine blew up with your RPMs went to high and you forgot to change gears. To indicate how high your RPMs are you need some sort of visible feedback. I also added audio feedback, but more on that later. I decided to do a multi-texturing job for a '70s-ish retro-looking "futuristic" dashboard panel. I have 2 textures; empty RPM, and full RPM. I have a simple shader that takes a uniform float factor of engine RPM from 0.0 to 1.0. Because my gauge is horizontal, I can just make everything to the left of the RPM factor (as a factor of horizontal position) use the "full" texture, and everything to the right use the "empty" texture. So if the RPM factor is 0.5, then the left half is coloured with the full texture, and the right half with the empty.
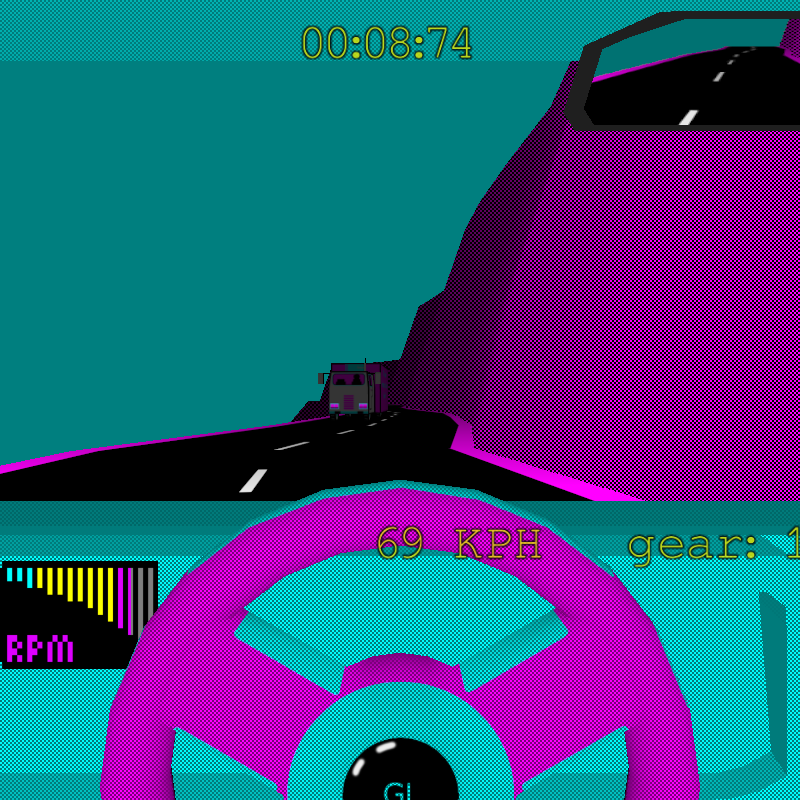
The tachometer at about a factor of 0.8. The left 8/10ths of the gauge sample from the "full" texture.
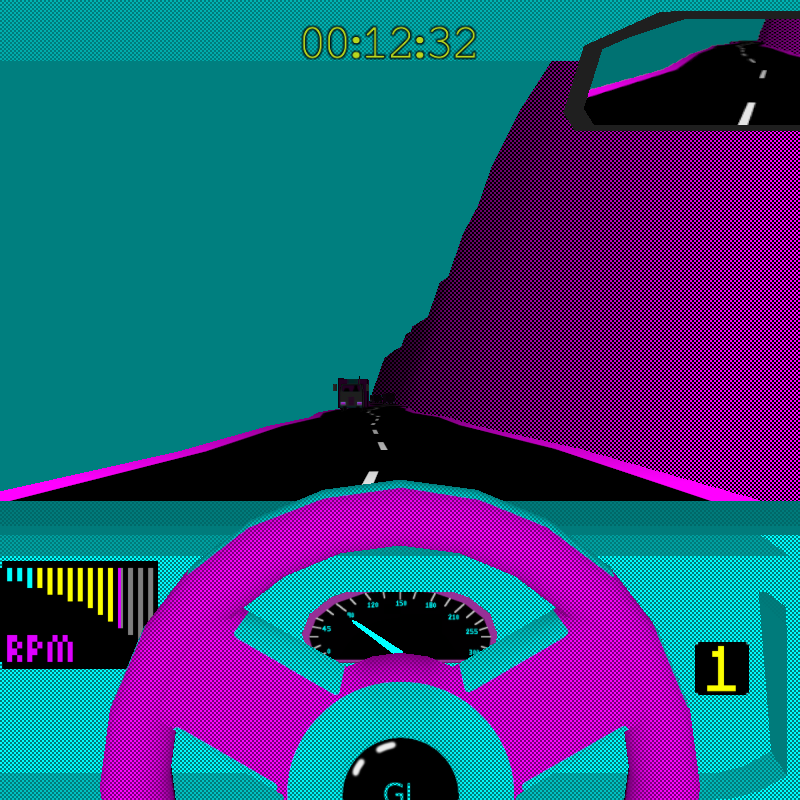
The speedometer was easy to do - just a rotating needle mesh over the top of texture meter. I got lazy and just switch between numbered textures for the gear indicator.
An analogue (needle) speedometer would have been tricky to make in raster graphics, but I don't need to even think about it here - I have a simple, textured mesh for the meter, and another mesh for the needle. I rotate this between -90 and +90 degrees based on the current speed in kilometers per hour up to 300 (I've also changed the game to metric).
The gear indicator just uses 6 different textures {N, 1, 2, 3, 4, 5}, and I swap these as I change gears. This was a bit lazy - a single image containing all 6 sub-images would be more professional. For all my single-plane meshes I use "attribute-less" rendering where I don't have a vertex buffer of mesh points - they are hard-coded in an array in the shader and I index the appropriate one via the built-in gl_VertexId variable.
The trucks are just boxes stuck together in Blender. I generated texture coordinates from projections, exported an outlines image from Blender, drew over this quickly in GIMP, and used that as my texture. The wheels I deliberately made separate meshes, as part of a simple animation demo. These are animated by a parent-child relationship with the truck body (the parent) and offset from the centre to each of the four positions. The wheels continually rotate over time around their local X axis. They don't actually stop rotating. This is done with a matrix multiplication hierarchy.
The texture was very simple, and as I didn't need any transparency, I thought it would be neat to use the alpha channel as a factor for an emission map. The fragment shader uses an interpolating mix() with the alpha channel to mix the full-colour texel with the distance-darkened texel. I used this on the head and tail lights to give the illusion of lights.
As I was generating the road I created an array containing the start/end position of each straight segment. I offset this to either side of the Z axis to get the middle of each lane. One lane's direction counts up from zero, and one counts down to zero.
I start each truck at a specific node index along a particular lane. Each truck heads in a straight line direction to the next lane marker from the array. When closer than 1m it updates its "current" node to the next index, and rotates to face the new target. This creates rather linear, blocky movement, which suits the game entirely.
I just use a straight-line distance between player and trucks to determine crashes - under a certain distance is a crash. I use squared distances to reduce computational cost. I can easily test all the trucks, every step without any real overhead problem.
If you crash with the traffic, or with the cliffs or edge, or blow up the engine, the windscreen shows an alpha-blended "smashed" version, like in the original for a delay of about 3s, then puts you back on the road in a hopefully sensible position at the nearest segment end-point. The delay hurts your overall time.
A simple time-step model is used to update anything that moves in the game. I use a time-step of 0.02s (50Hz) for simulation. I accumulate elapsed time every frame of rendering in a counter, and then:
During my PhD I came up with a mechanical simulation model for cars. I thought, since I haven't even opened my thesis since then, that I'd re-implement that. I actually found some code from 2008 and re-wrote that for my engine sim. If I'm honest about it, it was more fun to play before I added the realistic driving. I found the actual stats (gear ratios, wind-tunnel values etc.) for a Lamborghini Countach and plugged these in to the game.
I keep track of the currently selected gear (an integer) which looks up gear ratios from an array. When RPM of the engine gets very high or very low the player must change gear. I change the pitch of the engine sound based on the current speed (rpm) of the engine.
For my first time I tried the IrrKlang library for audio. I quite liked the Irrlicht rendering engine when I tried it some years ago, because it was very concise and tidy. IrrKlang is very easy to get running - much tidier than OpenAL, and much less bloated than FMod Ex. Time-to-sound-played is about 1 minute. Hard to beat! Unfortunately it's C++ though, not C, so I had to change my compiler. I can say that I like it and would probably use it again.
I have 3 sounds - an engine loop, a crash event sound, and a music track. Rather than use something like the original, I hunted for a 'period piece' of 1987 cheesy underground techno. I found one called "Amama" by a group called "Pink Project" from 1982. Perfect! I didn't put the track in the version that I uploaded, just in case!
My final addition was a suitably awful-looking victory screen that prints your finishing time and number of crashes over it. I found a suitable picture of a Countach on some cliffs and "coloured it in".
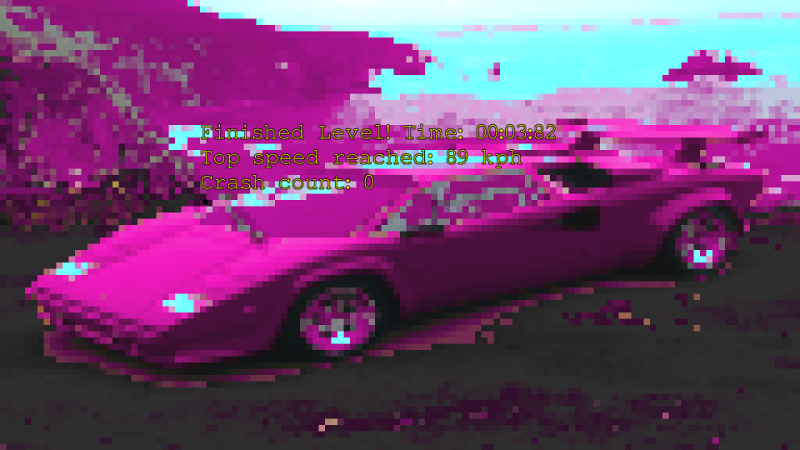
The stylish victory screen with text rendering.
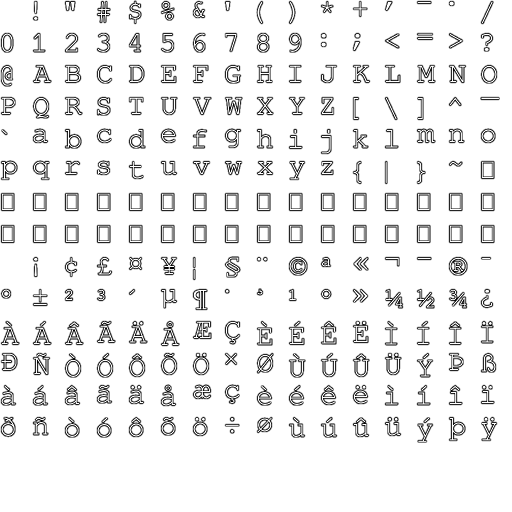
The font atlas. I pre-calculate the texture-coordinates to use for each character in a string of text and generate geometry for each.
The text is from a simple drop-in library that I made for OpenGL, to make student assignments a bit easier. You can find that on GitHub: https://github.com/capnramses/opengl_text_rendering. It uses a bitmap atlas that I generated (with yet another tool that I put on GitHub) of a free font. This also provided a text file of the size of each glyph. I have a little function in my drop-in code that maps strings of text into the appropriate texture coordinates within the atlas. A rather brutish approach takes the size of each glyph and generates triangles big enough to fit it. Alpha blending is used to make the background transparent so that the text can overlay the background.
I have a debug mode that I can compile to with the -DDEBUG flag. This prints a frame counter and various draw and update counts over the display.
I added a simple "don't render anything behind the camera" test to keep the number of draw calls to a safe minimum. I also added a maximum draw distance check before drawing anything. I wanted to demo simple hierarchical animation, so my trucks actually use 5 draw calls, when they should really only need 1.
My textures and shaders were all pretty trivial, and I didn't have many uniforms abusing the bus because of my attribute-less rendering. I limited the speed of text updates to about 0.1 seconds, as these do generate new triangles every time that the text changes.
I could have added-in uniform buffer objects to share my camera matrices around all of the shaders - it would have been a good case for this as I was deliberately using OpenGL 4.2 and had several shaders. I wanted to keep everything easy to read for initiates though.
I spent about 5 evenings on this - about 15-20 hours in total including Twitter distraction nonsense. The design was basically just a road generated in a loop, and the rest was just plugging extra features on until I ran out of time.
I drew my algorithm for generating the road terrain before I coded it - this saved me a lot of time.
I wrote the whole thing in plain C, but used a C++ compiler so that I could try the IrrKlang audio library. Each module of my programme is a separate C file. There are no classes, object orientated things, templates, inheritance, few comments, little-to-no code re-use, and long functions are the rule. I only use a loop if I copy-paste code more than 3 times. There's not a single design pattern anywhere. I barely did any validation. Errors are not try-catch clauses - they just dump to terminal with an assert() at most. I don't ever do any re-factoring - I write it in a simple style the first time around. I wrote most of my code in plain text editors - I don't care which one - but nano on the BASh terminal, gedit, and Wordpad on Windows are my most commonly used ones, because they have very little extra-fluff - if you're goofing around with "productivity enhancing" plug-ins you're wasting your time. These things usually take more time to install and load than any time they potentially save. I don't need syntax highlighting, and would rather read a man-page and actually understand a function that I don't know than use some unintelli-lookup rubbish. I don't use an IDE unless it's to keep someone else happy - Unix Makefiles are much quicker and easier to fix. I work on 4 different machines, and 3 different operating systems, and it was really easy to just copy-paste my Makefile and tweak to get it running on different platforms. I don't use any meta-build generator tools - that's just more software engineering complexity that makes a big mess. I very seldom need to debug anything - I feel like needing to debug is a personal failure to understand my own logic - I prefer to re-read my code to understand. When I do debug, I use command-line tools like gdb - a back-trace is usually all I need to find a bad memory access or broken library. I think using an IDE with easy-to-use breakpoints can quickly train you to rely on them and adds further passes over your code as part of your routine. I barely ever do any C-side profiling. Most of the actual debug and profiling tasks are for the GPU, and I use a mixed-arms approach to narrow-down these issues - a variety of simple tools and techniques to visualise problems with colours.
I know people that are religiously fanatical about OO design and software engineering, and think I'm some sort of horrible heretic to even entertain this notion, but not bothering with any software engineering "musts" meant that I can code graphics extremely quickly. While they're carefully encapsulating their classes and making an architecture of generic objects I'm already rendering my final screen.
My upstairs neighbour actually made a formal complaint to the building manager about my coding playlist while I was working on this so now [headphones] is on there.
I doubt there's many people that code OpenGL faster than me [gauntlet laid down] - although a few of my students most definitely got more done in a shorter period of weeks!
I didn't do the Police-car mechanism! I left this out of my plans because I knew it would be a bit too involved, and take too long. I wanted to finish before the student assignments were due. In the original you had a Police radio detector on the dashboard, and if driving too fast could be pulled over by the police and given a ticket!
I didn't add any other types of car traffic - I got a bit attached to the trucks.
I didn't add any more levels, because basically the original game was only one course that repeated. I just made my one-level game randomly generated instead.
The original game had shoulder lanes and hills. Hills might have been more interesting for driving on, although would have required some further complexity. It might have been cool to add tunnels or something.