I bought an original Game Boy off eBay. I never had one, but I was curious, and wanted to see what all the retro stuff in games these days was alluding to. It's in some ways a clever little design. Everything is supremely well put together, all the components and cartridges have a nice design, and it's unbelievably robust for a piece of electronics. Twenty or so years later and it still works perfectly.
The downside is the awful, awful LCD-like dot matrix display. It requires very strong direct sunlight to see anything at all. This is in the days before back-lit digital displays, which was surprising. We don't have very strong direct sunlight in Ireland, so it's basically impossible to use. With the lights on inside at night you can almost see the detail when you hold it on an awkward angle and never move it. There is a contrast knob on the side which is basically just there to torment you. I thought it must just be a worn-out display so I did some reading, and yep, they were actually all that bad. Nintendo produced a whole series of crappy half-measures that you bought to attach to the top until you have a giant lights-and-shades thing on the top that looks like a prop from Ghostbusters.
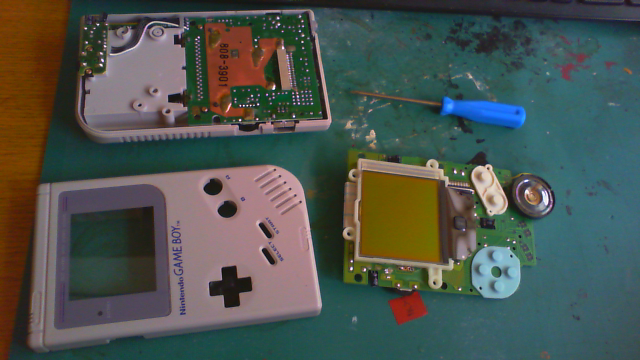
I've been brushing-up my electronics skills lately, and my Arduino kit still hasn't arrived, so I was half-thinking of modifying it to begin with. The natural first option was installing a back light for the display. First I had to get a tri-wing screwdriver to undo Nintendo's custom screws.
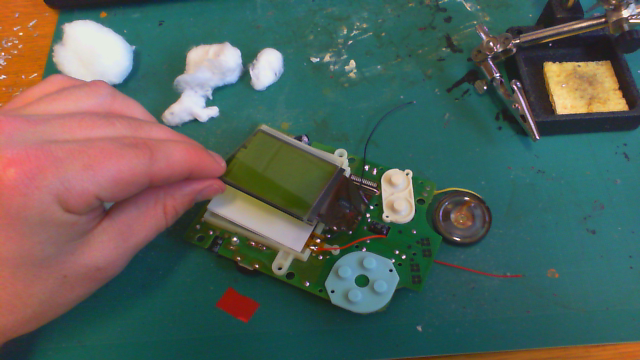
I bought a little thin 4x mini LED back-light panel that would fit in behind the display, but first I would have to strip off the reflective backing from the original display. This was no small task. I couldn't lift up the display more than about 1cm to get to the back because of non-removable strip connections on two sides of the panel. What I did was start peeling it off with the help of a scalpel, but only the plastic padding came off, and the silvered reflective coating mostly stayed stuck fast to the glass panel. Boy was that hard to get off. I used my Science Gallery membership card to scrape it off. It took ages. Then there was still a bunch of smeary glue stuck all over the glass.
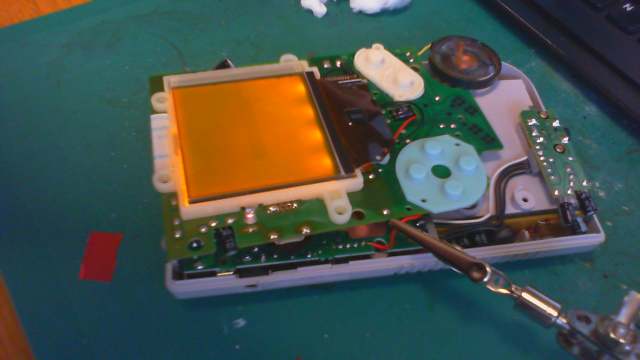
The arts shop across the road was no help for spirits, but I told my story to the pharmacist and she was infinitely more helpful. So I got make-up remover cotton balls and nail-polish remover. I think that she believed me...anyway that got the glue off. I cut some bits of the plastic casing out to make room for the wires, and soldered them on to +6V and 0V points on the boards. I got this piece of polarised film that is supposed to go in-between the display and the front of the case. It definitely works when you turn it 90 degrees, which is pretty neat, but it seemed to work just fine without it, and is actually a bit brighter. Material on the web seemed to suggest that it wouldn't work without it...not sure about that, maybe there was an existing polarised film already stuck to my display? In any case it came in contact with the nail polish remover, and then my decision was made for me.
I polished the bejaysus out of all the panels and got all the smudginess off them using the lady products. Much clearer.
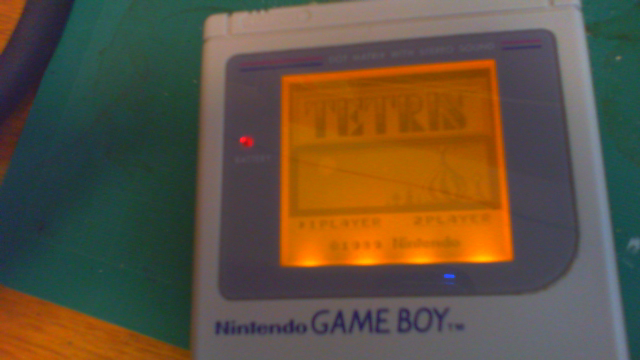
It works amazingly well. I went with a yellow light because the other colours didn't look quite as bright to me. If memory serves me correctly blue LEDs tend to require a slightly higher voltage and current, which is probably why they didn't look as good. Red may have been even brighter, but this is bright enough and looks kind of retro (ugly in a throw-back charming way?).