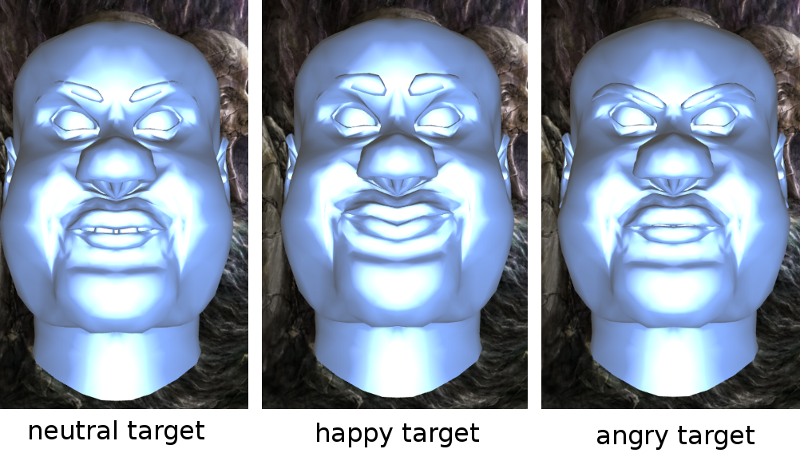
A mesh that I downloaded from Turbosquid had 3 morph targets that I exported as 3 separate meshes; a neutral mesh, an angry mesh, and a happy mesh. We will make a vertex shader that can blend to create a mesh anywhere in-between these 3 targets.

Blend shapes, also called "blend keys", and morph target animation, is an alternative animation technique to hardware skinning. Hardware skinning uses a skeleton to drive the animation of vertices. With blend shapes we actually have a completely separate mesh for each animation pose. We call each mesh a "blend key" or "morph target". We then use the vertex shader to get a linear interpolation between targets, based on the current time. The neat thing is that we can combine several targets at once. It's also much easier to create organic or "squishy" animations than with a skinning system. Some examples of where blend shapes are useful:
As a simple example in WebGL, I exported an "open", and "closed" copy of my door mesh. A slider sets the the weight for open between 1.0 and 0.0, and closed is 1.0 - the open weight. The main difficulty was actually making sure that I had meshes with vertices that were in exactly the same order - until then I had the wrong points blending. This is also an example of an animation that is not ideal for morph targets - the door should open in a circular arc, but I'm using linear interpolation which makes it a straight line of movement. I could add several intermediate morph targets to break the arc up into several small linear movements, but this will produce a rough animation.
The real work in getting blend shapes to look good is in the hands of the artist, and it's a bit tricky.
You can see that morphing between two completely different meshes might take a bit of work. Texture coordinates might also need to be changed to avoid stretching. If vertices are not exported in the exact same order as other targets then animating between targets is going to produce some bizarre artifacts. Blender3d has a check-box that you can tick to preserve vertex order when exporting .objs. We are going to be using linear interpolation, so rotating movement is not going to work very well unless a set of blend targets are very carefully created. Any change in direction really needs another target.
Some plug-ins for 3d modelling software will export morph map textures instead of separate meshes. This is essentially the same data; each vertex is represented by a pixel in the texture, and each RGB value is the scaled XYZ offset for that pose. This is probably a bit limiting, as we can sample only a limited number of textures in shaders.
I downloaded a free mesh off TurboSquid, and exported several different facial animations as separate meshes.
When we animate with the vertex shader, we have all of our blend targets stored as per-vertex attributes (in vertex buffers), and we can associate all of them with a single vertex array object. Basically, we'll have a vertex shader with a lot of in vectors. How you combine, and interpolate between targets in the vertex shader is going to depend on how your artist has designed them - perhaps there are blend targets for animating the top and bottom of the mesh that won't affect each other. For example, you might interpolate arm targets separately to leg targets.
Your vertex shader needs to do this:
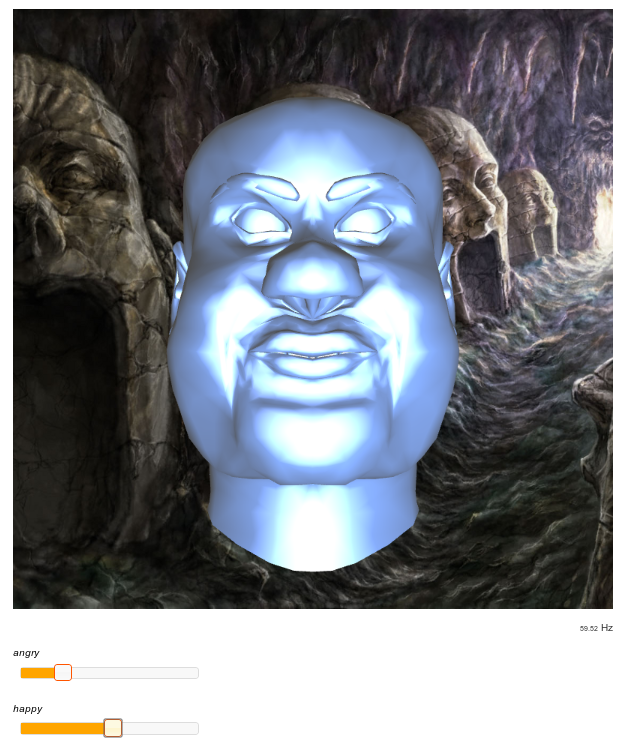
In my case I have a neutral face pose, a happy face pose, and an angry face pose. These poses affect the entire mesh. I'm going to rig it up so that the face can be 0-1 happy and 0-1 angry. When happy and angry add up to less than 1, then I'll use a proportion of neutral. It's not likely that you'll be fully happy, and fully angry, but I think it's nice to show that we can combine several poses at once. Note the use of the clamp() function to ensure that the neutral weight is always between 0 and 1. I get a sum of all the weights, and then divide each weight by the sum. This gives me a factor for each morph target, where all the factors add up to 1. I just used a stock-standard weighted-average to work out my mixed pose.
// vertex positions for targets
in vec3 neutral_vp;
in vec3 happy_vp;
in vec3 angry_vp;

/* any other other per-vertex data such as normals goes here */

// projection-view-model matrices
uniform mat4 P, V, M;
// weights for all morph targets except neutral target
uniform float happy_w;
uniform float angry_w;

void main () {
  // if other weights add up to less than 1, use neutral target
  float neutral_w = 1.0 - happy_w - angry_w;
  clamp (neutral_w, 0.0, 1.0);

  // get a sum of weights and work out factors for each target
  float sum_w = happy_w + angry_w + neutral_w;
  float happy_f = happy_w / sum_w;
  float angry_f = angry_w / sum_w;
  float neutral_f = neutral_w / sum_w;

  // interpolate targets to give us current pose
  vec3 pos = happy_f * happy_vp + angry_f * angry_vp + neutral_f * neutral_vp;

  /* normal stuff goes here */

  gl_Position = P * V * M * vec4 (pos, 1.0);
}
I have a demo of this in WebGL: talking head. I used the background image from http://www.gamersbin.com/game-wallpapers-f137/norak-dungeon-2moons-wallpaper-norak-dungeon-wallpaper-21470/. If you're using normals and texture coordinates, you'll probably want to interpolate these as well so that your targets can affect lighting and texturing as they change shape.
